• Skip to primary navigation
  • Skip to main content
  • Skip to primary sidebar
  • Skip to footer

UTECHPIA

UTECHPIA

  • Electronics
  • Developer’s Resources
  • All My Gear
  • Deals!
    • Electronics
    • Toys & Games
    • Bed & Bath
    • Health & Wellness

Using a TV as a Monitor!

Using a TV as a Monitor

The age old question of should I use a TV as a Monitor used to make more sense than it does now.

The OLD reasons why a Monitor is Better than a TV (and thus it costs more).

  1. Sharper Text on the Monitor
  2. Better Color Accuracy on the Monitor
  3. Better Refresh Rates on the Monitor (so your eyes don’t get tired).

All that has really changed! Even with a Budget TV! Modern TVs have super sharp text now (as long as the TV has the option to output 4:4:4 at the resolution and refresh rate you need). The Colors are fairly accurate with modern TVs. And nearly all modern TV’s will offer 4K @ 60hz refresh rates so you eyes are comfortable!

I picked up a budget TV yesterday, spent $180 for a 50″ 4k TV and it blows my mind how great it is to use as a Monitor! The important thing to note: just about any modern TV can be used as a monitor, but if you want sharp text, and a comfortable refresh rate, it must have a Computer mode where it will be able to do Chroma Subsampling of 4:4:4 at 60Hz @ 4K. To find our which TVs have this, check out this chart here: https://www.rtings.com/tv/learn/chroma-subsampling

If you have room to sit several feet away from the TV, you can get an amazingly HUGE TV for around $500! Check out these two amazing deals right now:

Vizio 70″ TV that works great as a Monitor

Another store that has the same TV for the same price as above:
SamsClub also has the same deal, (chat customer service to get the sale price even when you are not a member!)

How to get Sam Club Discount price, when you are not a Sam Club Member:

Live Assistance
Sam’s Club homepage logo
Chat
Status: Connected
Jorge (Listening)
Jorge: Thanks for contacting Sam’s club, my name is Jorge. How may I help you?
David Nguyen: Hi Jorge!
David Nguyen: I’m interested in ordering Item # 980283713
David Nguyen: because of the great sale you guys have
David Nguyen: but I’m not a Sam Club Member
David Nguyen: Can I still order, and if so, what would the price difference be for me, as a non-member?
Jorge: You can purchase it as a guest member David
Jorge: I can provide you the link if you want
David Nguyen: Oh! yes, please.
David Nguyen: will it be a different price?
Jorge: Sure David
Jorge: Here we have the link https://www.samsclub.com/account/guest-registration
Jorge: And yes David, it should be the same price
David Nguyen: Thanks!
Jorge: A pleasure to be able to assist such a patience and valued member today David, anything else I can assist you today?
David Nguyen: I’m signed up as a guest, but the item is not the same price as the members price.
Jorge: I see David, then, once you received your order, you can contact us back and
Jorge: We can adjust the price difference without any problem, don’t worry
David Nguyen: Are you sure you can do that, even when I am NOT a member?
Jorge: Yes David, I already checked that
Jorge: You just need to contact us back once you got your order
David Nguyen: okay, that’s fantastic! Thank you!
David Nguyen: Can i save a copy of this chat for reference?
Jorge: Yes you can save it
David Nguyen: how do i do that?
Jorge: You can copy and paste this conversation and save on your computer as a document
David Nguyen: okay, thanks!

BEST Gaming PC Build for any budget! ALL ITEMS IN STOCK!

I’ll do my best to keep this page updated.

Here are all the latest budget builds:

https://docs.google.com/spreadsheets/d/19_fZnGkV9CwxeG-w-gt-MYr_CZjJg2x6KRLh1yQrl0Q/

^^^ Click on the link above for FULL Screen view of the spreadsheet!

GCP

Last updated December 8, 2020

UPDATE!!! Here’s a more detailed updated guide: I recorded a very detailed 2.5 video hour with step-by-step instructions on how to create your FREE Website using GCP here: https://www.pixelstabbers.com/courses/secrets-to-getting-your-free-photography-website/

I’m going to show you how to setup a WordPress Website on Google Cloud Website for FREE!  All you need is your own domain, (like UTECHPIA.com, PixelStabbers.com, MostEpicDave.com, Or MidnightCoffeeSampler.com.  if you don’t have a domain name yet, , you can get one at www.utechpia.com/namesilo It only costs you about $9 a year. 

We’re going to setup WordPress Website Hosted on Google’s Super Fast and Super Reliable Cloud Servers for FREE!

The reason why we can get away with using Google Cloud Platform to host our website for FREE is because we will take advantage of TWO promotions.

The first one is the FREE $300 Google Cloud Credit.  Which anyone can get, with a basic Gmail Account.  However, you will NEED a credit card to activate this promotion.  So this promotion gives you $300 credit to use in anyway you want on Google Cloud Platform, as long as you use it within a year. 

Don’t worry, I know what you’re thinking: Great, $300 free credit for the first year, then it’ll probably cost a lot later on, right?  Yes and No.  And that’s the power of GCP, if your website has only has light traffic, then you can leverage the GCP Always Free Tier, which actually gives you enough for a perfectly functional website with a good amount of traffic.  For Example, all my websites are currently running on Always Free Tier!  The Always FREE Tier is always FREE, Unlike the $300 FREE Google Credit).   The ONE thing that we will need to pay on top of the Always Free Tier is a static IP address, which will cost only costs a few cents per month.  You technically don’t even need a static IP address, but I highly recommend it, for easy maintenance.

So now you’re probably wondering, what if I get a lot of traffic to my website.  Right?  Well..  Using the Always Free Tier does limit the performance of your website when a lot of people are accessing it at the same time and if there is a lot of content being downloaded from your website.  You’ll be able to monitor these things by setting up alerts for CPU utilization, Network Utilization, and Billing Alerts. 

But let’s be honest here.   Do you really expect a lot of traffic on your website?  That’s great if you are going to get lots of traffic to your website.  But for me, every time I create a website, I barely get any traffic, it usually takes me about 6 months to a year before I see some decent traffic.  And even then, the performance of the AlwaysFree Tier is still perfectly fine.  Should my traffic ever get high enough where I need to UPGRADE from the Always Free Tier, I can easily make the change within Google Cloud Platform.  And, it’ll actually cost money, but at that point, I should already be making a ton of money with my website.

And here’s a dirty little secret, If you really wanted to, you can create another gmail account, and signup for the free $300 credit again.  Then you can move your website from the old account to the new account, and you’ll $300 credit again to use within a year.  Morally, that’s not right to do, but a ton of people have asked me that question, so it is possible.

But like I said, all of my websites, have been running on the AlwaysFreeTier for over a year, and they work just fine.  I only pay a few cents a month, for the static IP address, and I’m totally happy with the results.

Alright, enough talk!  Let’s get started! 

All the commands and step-by-step instructions can also be found at www.utechpia.com/GCP

Step #1, Create a Gmail account if you don’t already have one.

Step #2, Buy a domain name by going to www.utechpia.com/namesilo if you don’t already have a domain name. 

Step #3, go to cloud.google.com and sign up for the FREE $300 Credit.  You’ll need to enter your Credit Card to Activate the Credit.

Step #4,, Deploy your Bitnami WordPress Website.

Step #5, Make a Static IP Address.

Step #6, Setup the domain name to point to the newly deployed WordPress Website!

Step #7, Notice that it is not secured.  Let’s create a FREE SSL certificate so that we have a secured.  This SSL certificate will AUTOMATICALLY renew, and it’s 100% FREE!

sudo /opt/bitnami/bncert-tool

Step #8, Let’s also remove the Bitnami Banner:

Open your httpd-app.conf for editing by running the following command:

sudo nano /opt/bitnami/apps/wordpress/conf/httpd-app.conf

Once inside the file, locate the following line:

Include “/opt/bitnami/apps/wordpress/conf/banner.conf”

Next, comment out the line by adding a # symbol in front of it – as shown:

#Include “/opt/bitnami/apps/wordpress/conf/banner.conf”

Next, save and exit the file (CTRL+X then CTRL+Y), and restart your Apache server by running the following command:

sudo /opt/bitnami/ctlscript.sh restart

Step #9: Let’s Enable a Swap File, this will increase performance and make the best out of our Always Free Tier Machine.

Enable Swap File

sudo fallocate -l 1G /swapfile

sudo chmod 600 /swapfile

sudo mkswap /swapfile

sudo swapon /swapfile

echo ‘/swapfile none swap sw 0 0’ | sudo tee -a /etc/fstab

Step #10: Let’s install Really Simple SSL to make sure we are always using the SSL version of the website:

Install Really Simple SSL

System detection encountered issues

A definition of a siteurl or homeurl was detected in your wp-config.php, but the file is not writable.

Set your wp-config.php to writable and reload this page.

SSH in and run:

sudo chown daemon:daemon /opt/bitnami/apps/wordpress/htdocs/wp-config.php

Step #13: Let’s setup our wordpress email address. 

Here we will be using our Gmail address, but if you want something like Hello@YourDomain.com, then you’ll need to pay for email hosting.  The cheapest option is using  utechpia.com/zoho They have a Free plan as well as the $1/month plan.

If you want the BEST email experience, I highly recommend G-suite, you can get it at www.utechpia.com/gsuite

Step #15:  Let’s step a Content Delivery Network to enable caching to increase the speed of the website.  We will increase security as well.

Step #15:  Let’s install a WordPress Theme to make it look nice!  You can get free themes online, but if you are serious about making a really good website without spending a ton of time, I highly recommend checking out these following themes:

WordPress Themes:

www.UTECHPIA.com/Extra

www.UTECHPIA.com/Divi

www.UTECHPIA.com/AspirePro

www.UTECHPIA.com/Pro

Let’s use the EXTRA theme today!

Appearance > Theme > Add New

Extra > Support Center > See that it is not healthy.

Notice that the Category Builder is not working:

And noticed that the diagnostic shows problems, let’s fix all those:

VM modifications:

sudo nano /opt/bitnami/apps/wordpress/conf/htaccess.conf

Add to the VERY end of the file:

<IfModule mod_substitute.c>

SubstituteMaxLineLength 20M

</IfModule>

Edit:

Sudo nano /opt/bitnami/php/etc/php.ini

Added at the very bottom:

post_max_size = 64M

upload_max_filesize = 64M

PERFECT!

One last thing that I want to change here is the footer, I want it to say my website:

Extra > Theme Options > Integration > Add Code:

<script>

var year = new Date();

year = year.getFullYear();

jQuery(function($){

$(‘#footer-info’).html(‘&copy; ‘ + year + ‘ <a href=”https://www.MidnightCoffeeSampler.com”>MidnightCoffeeSampler.com</a> | We LOVE Coffee & Midnight! | <a href=”https://www.utechpia.com/extra”>Wordpress Theme</a>’);

});

</script>

If you guys find this video helpful!  Please consider leaving in that last bit of code at the end of the footer which is an affiliate link for UTECHPIA.  I would greatly appreciate your support. 

Alright guys!  That’s the end of this video, I hope it was helpful!

If you have any questions, please don’t hesitate to ask below.  I’ll try my best to answer the questions, when I have time.  Otherwise, I will try to make an updated video to answer your questions.

If you haven’t already done so already, please remember to LIKE this video and SUBSCRIBE to UTECHPIA! 

Your Support is always, always appreciated!

Thanks so much for watching!  I’ll see you guys next time!

Developer’s Resources

Last updated September 10, 2020

How I became a Software Developer!

Reviewing some Big O Complexity for Data Structures and Algorithms.

After many months of research, I’ve gathered the following information to help me with my career path as a Software Developer. I hope these resources are helpful to you. If you have additional information or feedback, please don’t hesitate to contact me and let me know. Thanks!

How To Start:

Working on my Project at Fantasia, enjoying the journey and experience!

The best way to learn is to have a practical project that you can grow as you expand your coding skills. It can be a simple project, but you can add features and complexity as expand your knowledge of what’s possible! The project should aim to solve a REAL problem and serve a REAL need; that way you will eventually have real users and get feedback from real users.

Always be maintaining this project and make improvements, as you expand your coding skills and learn better programming practice. Learn to use GitHub or BitBucket to keep track of your changes.

This project will be a great talking point during your job interviews. Expect to answer questions about the project such as:

  • What was the scope?
    • How did the scope change over time?
  • What was the most challenging aspect?
    • How did you over come those challenges?
  • What resources/references did you use to help you.
  • What type of testing did you perform?
    • What are some test driven changes you’ve made, if any.
  • Why did you decide to use certain technologies?
    • Development Framework
    • Development Language
    • Database Solution
    • Hosting Solution
  • What decisions did you make when designing the architecture?
    • Authentication Methods Used
    • Security Precautions
    • Design Patterns
  • What are the trade-offs you had to take?
    • Why did you make such trade offs (ie, time complexity, space complexity, visual complexity, features, UI component, UX design, etc).
    • How would you improve the program if you had unlimited time resources? (time to work on it)
    • How would you improve the program if you had unlimited access to computing resources?
  • If the program took off, and started gaining massive user base…
    • What would be your concerns?
    • What would be your actions?

Books That I Recommend:

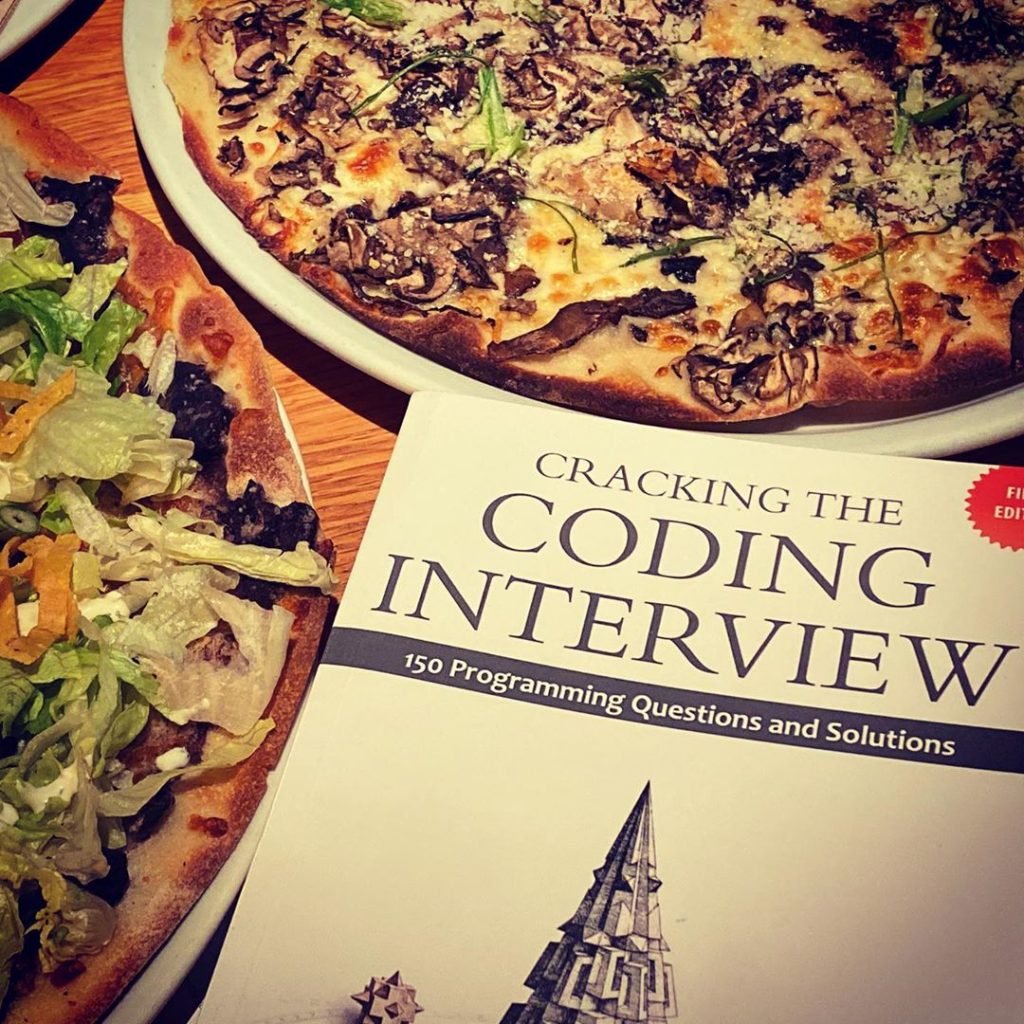
Reading one of the most useful book for Interview Prep.
  • Cracking the Coding Interview: 189 Programming Questions and Solutions 6th Edition by Gayle Laakmann McDowel: https://amzn.to/2Tz0wIR

Which Language to learn?

Focusing on learning One (1) Programming Language, and learn it well.

Although some people will tell you that leaning to program is language agnostic (meaning it doesn’t matter what language you pick); the truth is that there is more to the answer.

If you have an ideal job in mind, start looking at the job postings for those jobs and reverse engineer the skills needed to apply for those jobs; if they require Java, then learn Java, if they require C#, then learn C#.

If you are flexible and simply just want to pick a language to learn, I would recommend picking Java or C#, because these are well structured language and are best for learning how to understand the fine structures and strict requirements. Whereas a language like Python is easier to read and learn, but allows you to take many shortcuts that you can’t do in Java or C#.

Disclaimer: I learned two programming languages during my interview preparation. I ended up learning C# because the company that I was interested in working for used C# for nearly everything. I also needed to learn React Native, which is based on JavaScript, to build my Mobile Apps for my project.

Coding Bootcamp:

The journey takes lots of Determination and Self Discipline.

In my opinion Coding Bootcamp is a waste of time and money. Thanks to the abundant resources on the Internet right now; you can learn everything on your own if you know where to look. The biggest benefit of going to a coding bootcamp is the fact that they will give you coaching on interviewing skills and resume preparation. But you can also get all this practice with meet up groups and preparing with friends.

Some would say that coding bootcamp is great for individuals who lacks discipline at self-learning… While that is true, if this is the case, I think learning to self motivate is a more important skill that you should learn FIRST.


If you really think bootcamp is the right path for you. Make sure you thoroughly interview the schools to make sure they are the right fit for you. Some Bootcamps will require you to pay up front, others will invest in you in hopes that you will find a great job and give them a negotiated portion of your salary for several years. For more details: Visit the campuses and ask probing questions. Here’s a starting place to read reviews: https://www.switchup.org/rankings/best-coding-bootcamps

Online Computer Science Master Degree from Georgia Tech

While Bootcamps will show you the tools of the trade and teach you to use them via practical coding projects… Bootcamp programs lacks the computer science fundamentals (such Advanced OS, Network Security, Complier Theory & Practice). A traditional Computer Science (CS) Master Degree will enable you to develop better software because you know the finer nuts and bolts that go beyond just compiling your code.

The whole Georgia Tech Online CS Master program will earn you a bonafide MASTER Degree in Computer Science. The GREAT thing is that it is all online, it only costs ~$8000, and takes about 1.5 years to complete (or less if you not working at the same time). More Info @GeorgiaTech.

You can even audit/watch all the material for FREE go here: www.udacity.com/georgia-tech

FREE Online Resources:

  • Professional Georgia Tech CS videos:
    • www.udacity.com/georgia-tech
  • Course Curriculum:
    • www.freeCodeCamp.org
  • YouTube Channels:
    • Free Coding BootCamp
    • CS50

Whiteboard Coding Questions:

Leetcode & HackReactor: These are two websites where you can sign up and practice coding interview questions. I highly recommend being able to optimally solve EASY and MEDIUM level questions from this website. Being able to answer these whiteboard questions will give you the technical preparation you need for the interview.

I love this Udemy course (Mastering The Coding Interview). It is inexpensive as well, it should only be $10-$15, look for online coupon codes. Follow me on instagram @utechpia.dev and DirectMessage me, I’ll give you a super exclusive discount code that’ll take it down to under $10!

CoderPro: http://coderpro.com/utechpia <– exclusive discounts code if using code “utechpia”

AlgoExpert.io: http://algoexpert.io/utechpia <– exclusive discount code if you checkout with the code “utechpia”.

Interviewing Skills: http://techinterviewpro.com/utechpia <– exclusive discounts code if using code “utechpia”

Here’s my review on TechInterviewPro:

Projects:

Again, we mentioned this at the start of this Blog Post. There is no better way to build experience than to work on a project. The BEST projects are those that set out to SOLVE a real problem; build out the solution and even go as far as deploying it. You’ll learn a lot from launching a real application, you’ll get experience handling customer feedback, providing technical support, monitoring security, performance, and more. You want to work on a project that is meaningful to the world… As my wise mentor often tells me: You want to pick a project where, if it takes off and flies, it can become your startup company, and you won’t need to worry about interviewing for a corporate job anymore! 🙂

LinkedIn Profile:

You need to create a strong LinkedIn Profile, here’s a video that will help you get started:


TRANSFORMATION! Liquid Adhesive! Apple Watch Series 5! Review & How To Install WhiteStone Dome Glass

Hi Guys!  I hope you’re doing well!  Thank you for clicking on this video!  My name is David, and Welcome to UTECHPIA!

I just got the brand new Apple Watch Series 5, Nike Plus Edition, in the 44mm screen size.

Yep!  This is an awesome watch and I LOVE this thing! 

So, naturally, I wanted to protect the screen without any compromises!  I want the vibrant colors, the brightness, the sharpness, and the touch sensitivity to all be intact, with the screen protector installed. 

So, searching on Amazon, I found there are lots of screen protectors out there, but, honestly, I had a hard time finding the perfect one!   Some are plastic films, which feels rubbery and are prone to developing bubble underneath.  Some are made of glass, which is great, but they don’t cover the entire watch screen so they look terrible. 

I was really excited when I heard that WhiteStone also makes their famous Dome Glass for the Apple Watch!  I’ve been using the WhiteStone Dome Glass for all my phones and really love the quality of their tempered glass screen protectors.  The Apple Watch version of the Dome Glass  uses the exact same technology as found in their popular phone screen protector.  Which means it provides excellent protection without taking away from the brilliant device experience regarding the screen brightness, clarity, and touch sensitivity.  Also, if you ever need to take off the screen protector, it comes off easily without damaging your Apple Watch.   

This one works for the Apple Watch Series 4 as well as the Apple Watch Series 5.  WhiteStone makes the Dome Glass for the both the 44mm watch face as well as the 40mm watch face. 

They even have a Limited Lifetime Warranty, which means that if your Dome Glass ever gets damaged or get worn out, you could a request a replacement through WhiteStone’s website.  And they’ll take care of you, they are really good with customer service. 

The only downside to this awesome screen protector, is that the installation process, which takes about 10 to 15 minutes, especially if it’s your first time installing one of these!  But don’t worry, we’ll do the installation together and I’ll walk you through each step of the way! 

Here are two quick tips to get you started right off the bat!

The First tip is to make sure that you do the installation in a dust free environment, so watch out for windows and air vents that might blow dust onto your screen while you are doing the installation.  You definitely do not want that. 

And the second tip I have for you is that you can use a USB power bank to power the UV Curing Lamp.  That way you can do your installation anywhere you want without looking for an electrical outlet. 

Here’s what comes in the kit:

  1. UV Curing Lamp
  2. Micro USB cable for the UV Curing Lamp
  3. A detailed manual with step-by-step instructions
  4. Installation Manual for the Metal Bumper Case
  5. Alcohol wipes
  6. Cleaning Cloths
  7. Dust removal stickers
  8. Level Bar
  9. Absorption Pad
  10. You get not 1, but 2 Tempered Glass Screen Protectors! (This is perfect If you have two apple watches!)
  11. Metal Bumper case
  12. Two bottles of adhesive, you only need one, the second bottle is for backup incase you mess up and need to try again. 
  13. The Bottom Tray and the Top Tray.  Make sure you note how the top tray is oriented with the bottom tray.  Also note the arrows on the Top Tray, which indicates where on the watch screen you will be putting the liquid adhesive.
  14. The Bottom Tray, keep in mind how Top Tray is oriented in relation to the bottom try. 

Alright, let’s get started!

Step 1: Make sure you are on a leveled working surface.  I used the “measure” app on my iPhone, but you can also just roll a bottle of adhesive on the surface to make sure it is leveled. 

Step 2: Remove the watch strap and turn off the watch.

Step 3: Use the alcohol wipe to clean the screen, all the way to the edges. 

Step 4: Dry off the screen with the cleaning cloth. 

Step 5: Carefully place the watch into the Bottom Tray.

Step 6: Place the absorption pad into the Bottom Tray.

Step 7: Line up the Top Tray by matching up the fixed tape part of the Bottom Tray with the level bar insertion part of the top tray.  Press down on all 4 corners to make sure it’s seated all the way.

Step 8: Use the dust removal stickers to remove any visible dust on your screen.  Take your time, you want to make sure there are no visible specs of dust. 

Step 9: Insert the level bar into the fixed tape of the bottom tray.  Make sure it slides in all the way!

Step 10: Take your adhesive bottle, and unscrew the gray cap.  Don’t worry, the liquid adhesive wont come out, yet.  It’s locked in there until you unscrew the other end of the adhesive bottle.

Step 11: Hold the adhesive bottle vertically over the center of the watch, paying attention to the arrows on the top Tray.  Hold it very close to the screen so that the liquid adhesive won’t splash when you release it.  Now, carefully unscrew the black upper cap of the adhesive bottle and allow the liquid adhesive to pour out from the bottle onto the watch face.  

Step 12: Wait for the about 5 seconds for the liquid adhesive to finish pouring out, and then remove the bottle.

Step 13: Carefully remove the liner on the backside of the tempered glass screen protector.

Step 14: Starting from the bottom, which is furthest away from the fixed tape, place the glass onto the level bar.

Step 15: This is the most difficult step of the entire installation!  So watch this step several times to make you fully understand it, that way you can get it perfect on your first try.  Here’s what you got to do: Push down the bottom part of the bottom tray, and then once the liquid adhesive touches the tempered glass, immediately pull out the level bar and stop pushing on the Bottom Tray.  The reason why it’s difficult is you got do both actions at the same time.   So practice it before you do it on the actual installation. 

Step 16: Wait for 30 seconds as the adhesive to spread completely.  Make sure you do not touch the screen while the adhesive is spreading.

Step 17: Place the UV light over the watch and turn it on for 15 seconds.

Step 18: Remove the Top Tray and the absorption pad.  Use the hole at the bottom on the bottom tray to gently take the watch out of the tray.  Be super careful as the adhesive isn’t fully cured yet.

Step 19: Use the Alcohol wipe to clean any excess adhesive.  Be sure to wipe along the edges, but again, be gentle as the adhesive is not fully cured yet. 

Step 20: This is the final curing step, place the UV lamp over the watch and turn it on for 1 minute. 

Step 21: And That’s IT, you’re done! Just power on your Apple Watch and you’re good to go!

Now you can enjoy the perfectly installed WhiteStone Dome Glass screen protector on your Apple Watch. 

Everything looks amazing!  The screen is just as bright as before, the colors are vibrant and everything looks clear and sharp!  The screen feels smooth and responsive, just like touching the native Apple Watch Glass!

You can install the included bumper case for extra protection.  However, the case is a loose fit, so it rattles when the watch vibrates; which makes the watch sound like a toy.  [ bumper case vibrating ]….  Yet, without the bumper case, itis easy to see and feel and touch the edges of the screen protector, which I kinda not like.  So I’ve been going back and forth about using the bumper case. 

Since the bumper case is a loose fit, if you bump it just right, it falls off pretty easily.  And of course, the bumper case makes the watch look a tiny bit larger.

But if that’s not your thing, that’s totally fine: you can use the Dome Glass Screen Protector all by itself. 

But this review isn’t about the bumper case.. It’s about the Screen Protector; and I can confidently say that the Whitestone Dome Glass Screen protector is simply the best screen protector out there for any price for the Apple Watch Series 5 as well as the Apple Watch Series 4!

The Question I have for you guys is: do you use a screen protector on your Apple Watch?  If so, which one?

Alright guys, that’s the end of this video!  Let me know if you have any questions. And if you haven’t already done so, please consider subscribing to UTECHPIA!  Your support is always, always appreciated!  Thanks so much for watching!   And I’ll see you guys, next time!

  • « Go to Previous Page
  • Go to page 1
  • Interim pages omitted …
  • Go to page 798
  • Go to page 799
  • Go to page 800
  • Go to page 801
  • Go to page 802
  • Go to page 803
  • Go to Next Page »

Affiliate Disclosure

As an Amazon Associate I earn from qualifying purchases.

Contact / Follow Me!

  • Email
  • Facebook
  • Instagram
  • Twitter
  • YouTube

Most Popular Posts:

  • Best Camera Straps!
  • Best Vlogging Camera of 2022!
  • Valentine’s Gift For Her!
  • Best Massage Canes

Recent Posts

  • Anker SOLIX EverFrost 2 40L Cooler, 42 qt Car Refrigerator, Electric Cooler with 288Wh Battery, Powered by AC/DC or Solar, for Camping, Travel, and Fishing, -4℉ to 68℉ (Only 1 Battery Included)
  • Govee Permanent Outdoor Lights 2, 100ft RGBIC Outdoor Lights with 72 LED Lights, IP67 Waterproof, 100 Scene Modes with 40lm White for Christmas Decorations, Works with Alexa, Google Assistant, White
  • Fanttik NEX E1 3.7V Mini Electric Screwdriver Precision Screwdriver, 12 Bits, 0.2N.m Torque Setting, Max. 3 N.m, Magnetic Storage, 5/32”Hex, Repair Tool Set for Phone Camera Laptop Watch
  • Fanttik D12 PLUS Laser Level Self Leveling 3 × 360°, 3D Green Cross Line, 5200 mAh Battery Rechargeable, Pulse Mode, Magnetic Bracket, Carrying Case, for Construction and Picture Hanging
  • Bedsure 100% Cotton Blanket Queen Size for Bed – Waffle Weave Fall Blanket, Lightweight and Breathable Soft Woven Blanket for Summer, Grey, 90×90 Inches
  • Zeta C6 Pro Max Instant Cabin Tent 6 Person Camping Tent Setup in 60 Seconds with Rainfly & Windproof Portable Tent with Carry Bag for Family Camping & Hiking, Upgraded Tent
  • Camping Tent 4/6/8/10 Person Instant Cabin Tent Setup in 60s with Rainfly & Windproof Portable Tent with Carry Bag for Family Camping & Hiking, Upgraded Ventilation
  • Fanttik V9 Mate Car Vacuum, 13000Pa High Power Cordless Vacuum, 2-Hour Fast Charge, LED Display&LED Light, RobustClean™ Portable Hand Vacuum for Car Rechargeable, Car Accessories Gift for Women Men
  • Fanttik T1 Max Soldering Iron Kit, Cordless Soldering Iron, 7 Seconds Fast Heating(390°F-840℉), Auto Sleep, 4 Precision Soldering Tips(C210), 360° Swivel Stand, Soldering Iron for Precision Repair
  • Fanttik X5 Max MANUAL HAND TOOL
  • Fanttik T1 Max Soldering Iron Kit
  • Zeta C6 Pro Max Instant Cabin Tent 6 Person Camping Tent Setup in 60 Seconds with Rainfly & Windproof Portable Tent with Carry Bag for Family Camping & Hiking, Upgraded Tent
  • Fanttik T8 APEX 2000 Amp Jump Starter, 20000mAh Car Battery Pack for Up to 8.5L Gasoline and 6L Diesel Engines with LED Display, 65W PD Fast Charger,12V Extreme Safe Lithium Portable Jump Starter
  • Plugable USB C Portable Monitor 15.6 Inch, 100W Pass-Through Charging for Your Laptop Smartphone Tablet, 3x USB-C 10Gbps Hub FHD 1920×1080 IPS Travel Display 1.85lbs, Protective Case/Stand, USBC-PDMON
  • Bundle of Bissell Little Green Pet Deluxe Portable Carpet Cleaner and Car/Auto Detailer, 3353, Gray/Blue + Bissell® Little Green® Spot & Stain Formula for Portable Carpet Cleaners, 2038G
  • Fanttik Slim V8 Apex Car Vacuum, 19000PA High Power, 4 in 1 Portable Mini Vacuum, 2.5H Type-C Fast Charge, Up to 40 Mins Runtime, RobustClean Handheld Vacuum for Car, Home, Keyboard Cleaning, Black
  • Anker Easy Fit HD Screen Protector, for iPhone 16 Pro Screen Protector, Ultra-Durable and Thin ShieldX Protection, Dust-and Fingerprint-Free with Extended Coverage, Fast and Easy Installation, 6.3-Inch for iPhone 16 Pro (2-Pack)
  • Anker Prime Charger, 100W USB C Charger, 3-Port GaN USB Charger Block, Foldable and Compact for MacBook, iPad, iPhone Series, Galaxy S24/S23, and More
  • Anker Ultra Magnetic for iPhone 16 Pro Case with Sturdy 360° Ring Stand, Military-Grade Shockproof iPhone 16 Pro Kickstand Compatible with MagSafe(White)
  • Air Choice Oil Filled Radiator Heater, 700W Portable Space Heater with Adjustable Thermostat, Electric Mini Heater Heat Up 120 Sq.Ft Quickly, Automatic Power-off and Durable Oil Heater for Indoor use

About Me

I’m a Software Developer, Mechanical Engineer, Photographer, and Tech Lover!

Thanks For Reading!
-David Nguyen

What is UTECHPIA?

A place where I can review, compare, and rank the latest tech gadgets.  I do lots of unboxing and reviews; some with unusual high energy for your entertainment!

Affiliate Disclosure

As an Amazon Associate I earn from qualifying purchases.

Copyright © 2025 · YouTube.com/UTECHPIA