Last updated February 11, 2022

It can seem hard to green screen, but it is really more of a “practice makes perfect” thing. This guide will lead you through the basics on green screening so you can green screen your videos with ease!
First of all, green screens are used by editors for many reasons. One reason could be that they want their footage to have some sort of background that is not there or would be not possible to go to where the filming took place. Another reason could be because they want an actor in front of a green screen and show them something else behind them. The list goes on forever, but the point is that green screens are valuable assets to filmmakers everywhere.
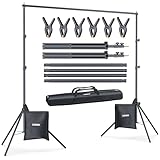
When it comes to green screening, there are three things you need: lights, green screen, and editing software. Obviously you also need green colored screens! You can purchase green screens online or at an art store (I got mine on Amazon: https://amzn.to/3HBCUJv). The lights are very important, since they set the green color apart from everything else. They make it pop out like icing on a cake. Lights come in many different varieties; I myself use normal desk lamps that have green bulbs in them for my lighting; however, if you don’t want to do this, you can buy “green screen” lights online. Lastly is your computer editing software; iMovie is free and great for green screening! If you are livestreaming, OBS is FREE and has a built-in Green Screen Features!
Now that you have all of your materials to green screen with, read on about how to green screen. First off, green screens are green and green only. The green color does not work with any other colors, so make sure you find green colored screens. Second of all is the lights; now that green screen lighting is green, remember that it needs to be green and nothing else. Do NOT use orange light or anything like that; it will show up as a gross yellow on your footage once you go into editing!
Finally, gather your material (green screen included) and we can start filming! Green screening isn’t hard at all once you get good at it – if you notice me struggling, its because I’m new at this too!
Follow these steps:
1: Lighting – set up your lamp and point it towards the green screen
2: Camera – film green screen on green screen setting (or green color)
3: Position yourself – stand in front of green screen and face it
4: Camera – film!
5: Editing – Import the video into editing software
6-7: Clean up background with some programs, add more clips if desired
8-9: Upload to YouTube or whatever site you want
That’s it!
You do NOT need to spend a lot of money on gear for your Green Screen, BUT you do need to buy the right gear. As mentioned before, LIGHTING is very important. Second is having a nice Green Screen, and Third, you NEED to be position CORRECTLY between you camera, lights, and greenscreen.
Here are some items you may be looking to purchase:
Last update on 2026-02-06 / Affiliate links / Images from Amazon Product Advertising API.


